From epic Wild West vistas to alligator-filled wetlands, America’s National Parks are home to some of the most beautiful wilderness on the planet. Kevin E G Perry rounds up those that should go straight to the top of your must-visit list.
The National Park System is one of the crowning glories of the United States. Signed into creation by President Woodrow Wilson in 1916, there are now a total of 63 national parks spread across the country.
From sprawling landscapes straight out of classic Westerns to towering mountain ranges and lush wetlands, they offer a diverse range of opportunities to explore the country’s unspoilt wilderness.
Last year America’s National Parks welcomed a grand total of 312 million visitors, up 5 per cent from 2021, although still some way short of the record 331 million visitors who flocked to the parks pre-pandemic in 2017.
If you’re planning a visit this year, here are some of the best places to enjoy America’s Great Outdoors.
Yellowstone National Park, Wyoming, Montana and Idaho
America’s original National Park, first established in 1872, Yellowstone’s place in the national imagination has recently been reaffirmed by the wildly popular television series of the same name. The park’s 2.2 million acres sprawl across state lines and are home to some 10,000 hydrothermal features such as steaming hot springs, mud pots and geysers. The best known is the spectacular Old Faithful Geyser, which shoots water up to 180ft in the air. You can also expect to see herds of bison and elk making their way across glacier-carved vistas.
When to go
Although Yellowstone is open year-round, it’s busiest during the summer months from late May to early September. Visiting either side of that peak period (early May or late September/October) may help increase your chances of seeing wildlife roaming around. Either way, it’s wise to book in-park accommodation well in advance.
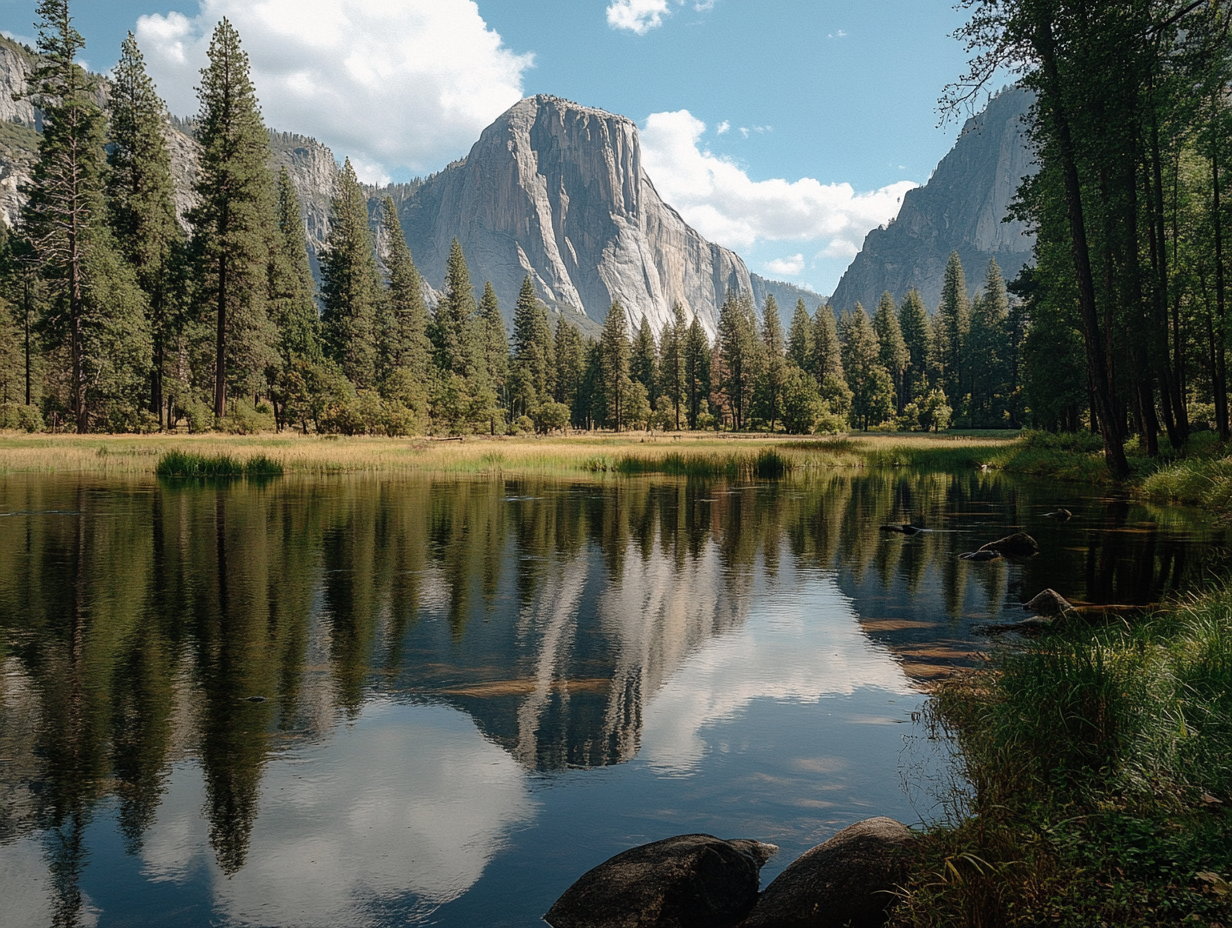
Yosemite National Park, California
The Yosemite Valley has been a protected area of natural beauty since well before the creation of the National Park system. It was in 1864 that President Abraham Lincoln signed an act of Congress ensuring the area would be held for public use “inalienable for all time.” Almost 160 years later, we’re still reaping the rewards of that far-sighted decision. Rock climbers come to test their mettle against giant granite monoliths like El Capitan, which looms some 3,593ft above the Yosemite Valley floor. Just as breath-taking are the magnificent giant sequoia groves. These trees, which stand up to 286ft tall, are so colossal that in 1895, as a marketing gimmick, they carved a hole in one of them so big you can still drive a coach through it.
When to go
Waterfalls like the spectacular 620ft Bridalveil Fall only flow during the summer months from May to July. It’s always worth checking the weather forecast, especially if you plan on visiting outside that peak season. Yosemite is currently closed due to record snowfall, with plans to reopen from 17 March.
Grand Canyon National Park, Arizona
In a country full of unforgettable landscapes, the Grand Canyon deserves its reputation as the most spectacular of them all. A mile deep and 18 miles across at its widest point, this great chasm of red rock took six million years to carve out. To best understand the scale of the canyon it’s worth hiking down into it: the popular Bright Angel Trail descends over 4,000ft from the South Rim to the Colorado River. Those who prefer to view the canyon from above can choose between the Grand Canyon Skywalk, a glass-floored platform at the West Rim which juts out over the abyss, or a birds eye’s view by helicopter.
When to go
Peak season runs from April to June, which unsurprisingly is when the weather’s best. July and August tend to be hotter and wetter. During winter months, access to the North Rim is closed, but the South Rim remains open year-round.
Everglades National Park, Florida
The only place on Earth where alligators and crocodiles live side-by-side, the Everglades are a one-of-a-kind ecosystem with plenty to reward adventurous visitors. An hour’s drive from Miami to Florida’s southern tip, it’s 1.5 million acres of wetlands, swamps and mangroves form North America’s biggest sub-tropical wilderness reserve. Away from the toothy reptiles, birdwatchers will be more interested in the herons, egrets and storks wading in the water. You’ll need to be out there too – either by kayak, canoe or airboat tour.
When to go
The Everglades are busiest during Florida’s ‘snowbird season’ from October to March, when tourists flood in from colder parts of the country. You can beat the crowds by visiting during the summer from June to August, although that will mean some early mornings to stay out of the muggy midday heat.
Arches National Park, Utah
Utah is home to no less than five National Parks, known together as the Mighty Five. While Canyonlands, Capitol Reef, Bryce Canyon and Zion are all well worth planning a visit to, it’s only the aptly named Arches National Park in the east of the state that can lay claim to the highest density of natural sandstone arches on the planet: more than 2,000 in total. You’ve seen them in Westworld, Thelma and Louise and countless Westerns, but there’s no substitute for exploring the desert on family-friendly hikes such as Park Avenue – named for its proximity to nature’s own skyscrapers.
When to go
Avoid the height of the summer heat by visiting either in the spring months, from March to May, or in autumn from September to October.
Denali National Park and Preserve, Alaska
If you want a taste of the United States’ remaining wilderness at its most remote and uninhabited, head to Denali. Spread across six million acres, this Alaskan wonderland is crossed by just a single road. The park takes its name from its highest peak, which at 18,000ft is the tallest mountain in the world from base-to-summit on land. In the summer, grizzly bears, wolves, moose and caribou stalk through valleys of wild flowers. When the snow comes, so do skiers, mountaineers and those hoping to catch sight of the aurora borealis.
When to go
Peak season runs from the end of May to the middle of September. During the winter months, from the end of September to April, visitor centres are closed but the park stays open for activities like skiing, dog sledding and snow-shoeing.
Joshua Tree National Park, California
A three-hour drive east from Los Angeles, Joshua Tree National Park exerts an irresistible pull on hikers, climbers and artists drawn by its dreamlike vistas and rock formations. The park may be best enjoyed at night, when the lack of light pollution allows the milky way free reign to dance across seemingly unending skies. Beneath this heavenly spectacle, the hardy trees that give the park its name reach up as if in prayer, or supplication.
When to go
The park is at its most popular from March to May and from October to November as visitors aim to avoid the swelt.


