Want to travel the world this summer at a low cost? Find low prices of drinks and food at places such as Vietnam or Japan
Picking out places to visit for the upcoming summer may come with its challenges, especially for those on a budget.
However, according to Post Office, a British-based mail and financial services company, there are opportunities to explore destinations around the globe without straining your finances. Countries such as Vietnam, South Africa and Japan present enticing options where in-country costs remain relatively low.
10 cheap places to travel on a budget
Post Office released the Holiday Money Report for 2024. In its report, it shares cheap hotspots to visit on your next adventure.
Post Office based its recommendations on costs of tourist essentials, like drinks and meals, instead of the price of traveling by plane or accommodations.
Paphos, Cyprus
Paphos offers a rich blend of modern amenities and ancient sites, catering to diverse traveler interests. For example, visit Agia Kyriaki Chrysopolitissa, one of the oldest Christian churches in the world, according to Hotels.com.
Per the U.S. Department of State, when you visit Cyprus, make sure to only enter and exit the Republic of Cyprus, not the Turkish Republic of Northern Cyprus, for your safety. Paphos is in the Republic of Cyprus.
Marmaris, Turkey
Marmaris, situated at the meeting point of the Mediterranean and Aegean Seas in Turkey, is celebrated for its nightlife, beaches and clear waters. During summer, it offers ferry services to Greece, including trips to Rhodes, per Mares Travel Agency.
According to the U.S. Department of State, exercise caution when visiting Turkey. There is a small possibility of terrorist attacks and wrongful detaining of U.S. citizens. Furthermore, do not visit the Sirnak province, Hakkari province or anywhere near the Syrian border.
Kuta, Bali, Indonesia
Kuta is known for its stunning coastline, a popular spot for surfing. There are also cultural spots such as Buddhist temples and theater or conservation centers, according to Hotels.com.
Per the U.S. Department of State, exercise caution when visiting Indonesia. There is a risk of terrorist attacks, natural disasters and violent demonstrations. Also, stay away from the Central Papua and Highland Papua provinces.
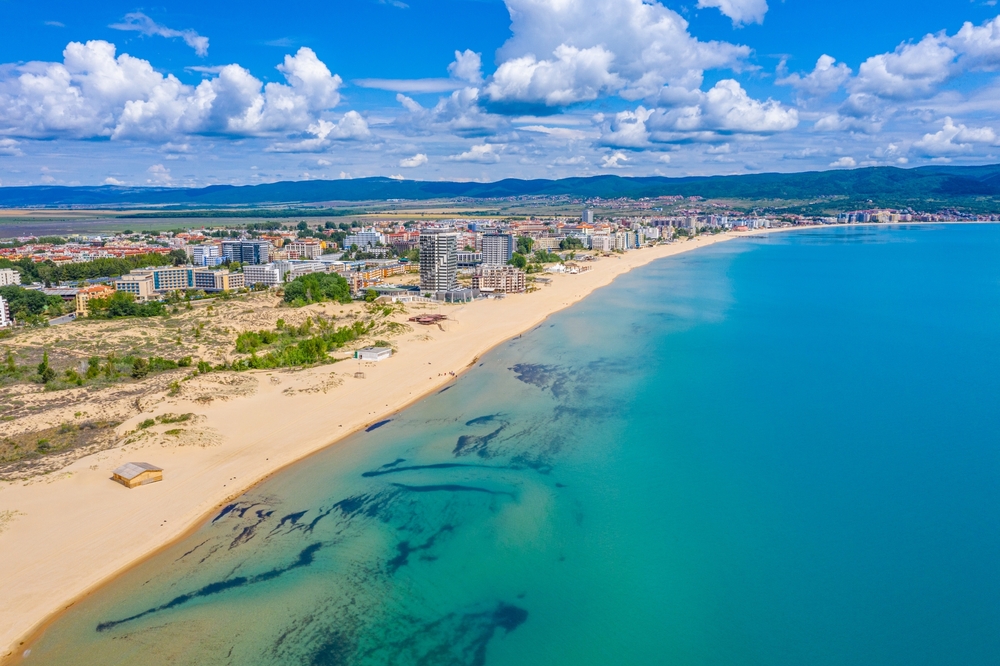
Sunny Beach, Bulgaria
Sunny Beach, found on Bulgaria’s Black Sea coast, attracts individuals with its beaches and is great for watersports, nightlife and amusement parks, per Tripadvisor.
According to the U.S. Department of State, you can exercise normal precautions in Bulgaria.
Sharm el-Sheikh, Egypt
Sharm el-Sheikh is a resort town in the Sinai Peninsula. Beyond resorts, there are also great luxury restaurants and nightclubs to visit. Also, due to its location on the coast, snorkeling around the coral reefs is popular, according to Britannica.
Per the U.S. Department of State, “The Department of State Travel Advisory warns U.S. citizens to avoid travel to the Sinai Peninsula (with the exception of travel to Sharm El-Sheikh by air) and the Western Desert.”
Algarve, Portugal
Algarve, located in southern Portugal, is known for cliff beaches and seafood. One of the popular places to visit this summer in Algarve is Lagos, per Lonely Planet.
According to the U.S. Department of State, you can exercise normal precautions in Portugal.
Tokyo, Japan
Tokyo is full of ancient culture while still showcasing modern attractions. For example, you could visit Asakusa, a Buddhist temple, or Tokyo’s Disneyland, according to Hotels.com.
Per the U.S. Department of State, you can exercise normal precautions in Japan.
Mombasa, Kenya
Mombasa, located near the Indian Ocean, has a lot of beachfront hotels and is a great place for watersports! Some of the top places to visit include the Fort Jesus Museum or Haller Park, per Tripadvisor.
According to the U.S. Department of State, parts of Kenya have a risk of terrorism, kidnapping, violent demonstrations or crime. Therefore, when visiting, one should exercise increased caution. Make sure to stay away from the Kenya-Somalia border counties.
Cape Town, South Africa
Cape Town is a beautiful location where one can find wildlife and a variety of plants. There are also great places to visit to learn more about the heritage, eat delicious food or to hike. For example, you could visit Lion’s Head Peak or Greenmarket Square, according to Hotels.com.
Per the U.S. Department of State, exercise increased caution in South Africa because of crime and civil unrest.
Tourists in Cape Town using GPS apps sometimes get directed through high-crime residential areas. Make sure to stay updated on the current events in the area, according to the U.S. Department of State.
Hoi An, Vietnam
Hoi An has diverse scenes from rice farms to beaches. Travelers can go shopping around the town or spend time hiking around farms. For a historical trip, stop by the Japanese Bridge or take a cooking class. For shopping, visit unique stores such as Cocobox to find jams or Reaching Out for tea sets and jewelry, according to Vietnam Tourism.


